Slim Photo Editor is a powerful and easy-to-use photo editing software that can help you make amazing edits to your photos and images. Whether you are a beginner or an experienced user, this software offers a wide range of features and tools to help you edit your photos with ease. In this guide, we will cover the basics of Slim Photo Editor, so you can start using it and get the most out of your photos.
The first step to using Slim Photo Editor is to download and install it on your computer. Once you have installed the software, you will be able to open an image and begin editing it. The main interface of the software is user-friendly and easy to navigate. It includes sections such as the Toolbox, which contains all the basic editing tools, and the Image Editor, which allows you to adjust the brightness, contrast, color, and other settings of your photo.
Once you have opened an image, you can begin editing it. Slim Photo Editor provides a range of editing tools, including crop, rotate, and resize, which allow you to adjust the size and shape of your photo. You can also apply filters, effects, frames, and text to your photo to enhance its appearance. Additionally, the software offers a variety of special effects such as blur, sharpen, and noise reduction.
Once you have finished editing your photo, you can save it in a variety of formats, including JPEG, PNG, and TIFF. You can also share your photos directly on social media platforms, such as Facebook and Twitter. Slim Photo Editor also offers a variety of other features, such as batch processing and printing, which can help you quickly edit multiple photos at once.
Slim Photo Editor is a great tool for both beginners and experienced users. By following this guide, you should now have a better understanding of the basics of using the software and be able to start editing your photos with ease.
Exploring the Latest Features of Slim Photo Editor
The Slim Photo Editor is a powerful and comprehensive photo editing platform that is designed for both professionals and enthusiasts. With its comprehensive suite of photo editing tools, Slim Photo Editor provides users with an impressive array of features for editing, organizing, and sharing their photos. In this article, we will explore some of the latest features of Slim Photo Editor and how they can help you get the most out of your photos.
One of the most powerful features of Slim Photo Editor is its ability to edit RAW images. RAW images are uncompressed and contain more detail than traditional JPEG images. With the RAW editing capabilities of Slim Photo Editor, you can make adjustments to your photos that are not possible with JPEG images. This includes adjusting white balance, exposure, and sharpness. Additionally, you can apply filters and effects to your photos to get the exact look and feel that you want.
Another great feature of Slim Photo Editor is its ability to create panoramic photos. With the panorama feature, you can easily combine multiple photos into one large image. This is perfect for capturing wide-angle scenes or creating a stunning landscape shot.
The Organize tab in Slim Photo Editor allows you to easily organize and manage your photos. You can create albums, add tags, and create collections of your photos. Additionally, you can view your photos in a timeline or in a grid view. This makes it easy to find the photos that you are looking for quickly and easily.
Finally, Slim Photo Editor makes it easy to share your photos with friends and family. You can use the built-in sharing features to post your photos to social networks such as Facebook and Twitter. You can also email your photos directly from within the application.
Slim Photo Editor is an impressive photo editing platform that provides users with a comprehensive suite of features for editing, organizing, and sharing their photos. With its RAW editing capabilities, panorama feature, and easy sharing options, Slim Photo Editor can help you get the most out of your photos.
Tips and Tricks for Editing Photos with Slim Photo Editor
1. Start with the Basics: Before you begin using Slim Photo Editor, take a few moments to familiarize yourself with the different features and functions. Read through the tutorials and user guide to get an understanding of the program’s capabilities.
2. Don’t Overdo It: When it comes to photo editing, it can be easy to get carried away and make changes that are too drastic. Look closely at each adjustment you make and make sure it looks natural.
3. Make Use of Layers: Layers are a great way to keep track of changes and undo steps if needed. Instead of making all your adjustments to one photo, create layers for each type of adjustment and make sure to save your progress as you go.
4. Play Around with the Filters: Slim Photo Editor has a variety of filters that can be used to enhance your photos. Experiment with different settings to see which ones work best for each photo.
5. Take Advantage of the Presets: The pre-made presets in Slim Photo Editor can be a great starting point for your edits. Use them as is or tweak the settings to your liking.
6. Save Regularly: Don’t forget to save your work regularly. This will ensure that you don’t lose any of your edits in case of an unexpected power outage.
How to Create Professional-Looking Photos with Slim Photo Editor
Creating professional-looking photos can be a daunting task for anyone, even experienced photographers. Fortunately, there are a variety of software solutions available to help you edit and enhance your photos. One such program is Slim Photo Editor, an easy-to-use photo editor developed by Movavi. With its powerful editing tools, you can turn your photos into eye-catching works of art in just a few simple steps.
To get started, download and install Slim Photo Editor on your computer. When the installation is complete, launch the program and select the photo you want to edit. You can then choose from dozens of professional-looking filters, frames, and effects to enhance your photo. You can also adjust the brightness, contrast, saturation, and other basic parameters to make your photo look perfect.
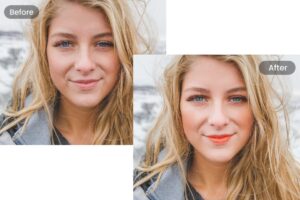
If you’re looking for more advanced editing options, Slim Photo Editor also offers a range of tools. With these, you can crop and rotate images, add text and captions, remove unwanted objects, and even create collages. You can also use the program’s retouching tools to remove blemishes and imperfections, as well as apply makeup to give your portrait a professional look.
Finally, if you want to save your edited photo, simply choose the desired image format and click the “Save” button. You can then share your masterpiece with your friends and family on social media or print it out for a physical copy. With Slim Photo Editor, you can easily create professional-looking photos in no time.