Mac Photo Editor is a powerful photo editing application from Apple Inc. for Mac users. It is available as part of the iLife suite of applications and is the ideal choice for Mac users who want to edit, enhance and share their photos.
Mac Photo Editor comes with an impressive range of features and benefits that make it an ideal choice for all types of users. It is easy to use and allows users to quickly and easily edit their photos in a variety of ways. It has a wide range of basic editing tools such as cropping, red-eye reduction, brightness and contrast adjustments, saturation, sharpness and more. It also offers advanced features such as layers, masking, brushes, gradients, text, shapes and more.
The Mac Photo Editor also provides users with the ability to share their photos with friends and family. It can be used to upload photos to social media sites such as Facebook, Twitter and Flickr, as well as to online photo sharing services such as Picasa and Photobucket. It also provides users with the ability to create slideshows, photo albums and web galleries.
Mac Photo Editor is the perfect choice for Mac users who want to easily and quickly edit their photos. It provides users with an intuitive and powerful photo editing experience that is sure to please even the most advanced users.
How to Use Mac Photo Editor to Enhance Your Photos
Mac Photo Editor is a powerful and comprehensive photo editing tool that can help you to create stunning images. Whether you are a professional photographer or an amateur enthusiast, this powerful software can help you to enhance your photos and bring them to life. In this article, we will discuss how to use Mac Photo Editor to its fullest potential.
First, you will need to open your image in the Mac Photo Editor. To do this, simply click the “Open” button in the software. You will then be presented with a dialogue box which will allow you to locate and select the photo you wish to edit. Once the photo is selected, it will appear in the Mac Photo Editor interface.
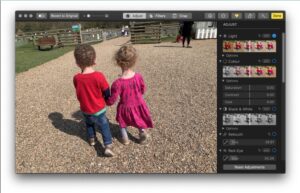
Next, you can begin to edit the photo. Mac Photo Editor provides a range of features to help you to modify your image. From adjusting the brightness, contrast and saturation to adjusting the color balance and sharpness, you can tailor the photo to your exact requirements. You can also add special effects and filters to further enhance your image.
Once you are happy with the results, you can save the image in a variety of formats, including JPEG, TIFF and PNG. You can also print the image directly from the Mac Photo Editor interface.
Finally, you can share your edited image with friends and family by email or on social media. You can also use the Mac Photo Editor to order prints of your image online.
By following these steps, you can take advantage of Mac Photo Editor to enhance your photos and create stunning images.
Tips and Tricks for Perfecting Your Photos with Mac Photo Editor
- Learn the Basics: Before you start perfecting your photos with the Mac Photo Editor, take the time to learn the basics of the software. Familiarize yourself with the various tools and features, and practice using them.
- Take Your Time: Don’t rush when editing photos! Taking your time will help you get the best results. Don’t be afraid to try different things and experiment with different tools until you get the desired effect.
- Use the Right Filters: Filters can be your best friend when it comes to photo editing. The Mac Photo Editor offers a wide range of filters to choose from, so take some time to explore the different options and find the one that works best for your photo.
- Pay Attention to the Details: When it comes to photo editing, details are everything. Take the time to adjust the brightness, contrast, and other settings to get the exact look you want.
- Take Advantage of the Cropping Feature: Cropping is a great way to improve the composition of a photo. Use the Mac Photo Editor’s cropping feature to make sure your photos look their best.
- Adjust the Color: Adjusting the color of a photo can make a huge difference in its overall appearance. Use the Mac Photo Editor’s color adjustment tools to make sure your photos look their best.
- Get Creative: Don’t be afraid to get creative with your photos! Try out different effects and filters to give your photos an interesting and unique look.
- Save Your Work: Don’t forget to save your work periodically! The Mac Photo Editor has a built-in auto-save feature, but it’s still best to save your work manually every once in a while just in case.
Following these tips and tricks will help you get the most out of the Mac Photo Editor and perfect your photos to your satisfaction.
Exploring the Advanced Tools of Mac Photo Editor
The Mac Photo Editor is a powerful and comprehensive editing suite that provides a range of features and tools for creating stunning, professional-looking images. This article will explore the more advanced tools available in the Mac Photo Editor, and how they can be used to enhance your photography.
The Mac Photo Editor offers an array of high-end tools to help you make precise adjustments to your images. These include the ability to adjust levels and curves, perform color correction, and apply creative color effects. You can also use the software to sharpen images, reduce noise, correct perspective, and retouch areas of your photos.
The Mac Photo Editor also contains a powerful selection of filters and effects. These can help you add a more creative touch to your images, from adding soft focus and vignettes, to applying textures and frames. You can also use the software to apply text and shapes to your photos.
The Mac Photo Editor also features a range of special effects which can help you create stunning images. These include a blur tool, which can be used to blur parts of the image, or an entire image, to create an artistic effect. You can also use the software to add HDR effects, light leaks, and vignettes.
Finally, the Mac Photo Editor also includes a range of tools to help you organize and manage your images. This includes the ability to create albums and collections, as well as the ability to organize your images by tags. You can also use the software to share your images online, with options for social media, websites, and email.
The Mac Photo Editor is a powerful and comprehensive editing suite, offering a range of features and tools for creating beautiful images. Whether you’re a professional photographer, or just a hobbyist, the Mac Photo Editor can help you take your photography to the next level.
Common Photo Editing Mistakes to Avoid with Mac Photo Editor
Mac Photo Editor is a powerful image editing tool with a wide array of features. However, as with any image editing software, it is important to be aware of some common mistakes that can occur while using the software. By avoiding these mistakes, users can create stunning images that make a great impression.
- Not Understanding File Types: Mac Photo Editor can work with a variety of file types, including JPG, TIFF, and PNG. It is important to understand the differences between these file types and select the one that best fits the image being edited. For example, some image formats are better for printing, while others are more suitable for web use.
- Not Utilizing Layers: Layers are a powerful feature of Mac Photo Editor. Not taking advantage of layers can lead to a flat, unappealing look and can be difficult to edit later. Layers can help to create depth and create a more interesting look.
- Not Adjusting the Color Balance: Color balance is an important part of editing any image. It is easy to overlook this step, but it can make a huge difference in the end result. Taking the time to adjust the color balance can help create more vibrant and realistic looking images.
- Excessive Use of Filters: Filters can be a great way to add a unique look to an image. However, it is important to use them sparingly. Overusing filters can lead to a distorted, unnatural look that may not be appealing to viewers.
- Not Using the Undo Feature: The undo feature is a great way to go back and fix mistakes. It is important to use it to make sure the image looks the way it is intended. Not taking advantage of the undo feature can lead to a lot of frustration when trying to fix mistakes.
By being aware of these common mistakes and avoiding them, users can create amazing images with Mac Photo Editor. Taking the time to understand the features and how to use them properly can help to create stunning images that make a great impression.