Mac’s built-in picture editor is a powerful tool for enhancing photos. With just a few clicks, it can help you turn ordinary photos into works of art. Here are the steps for using the built-in picture editor to enhance your photos.
1. Open the photo you want to edit. You can do this by double-clicking the image or by selecting it from the Finder.
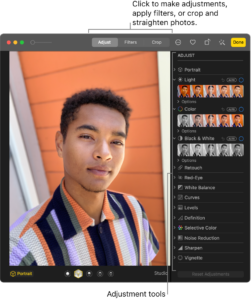
2. Once the image is open, click on the “Edit” button at the top of the window. This will open the picture editor.
3. When the picture editor opens, you’ll see a variety of editing tools on the right side of the window. These tools include the brush, crop, rotate, contrast, and saturation.
4. Use the brush to adjust the brightness and contrast of the photo. You can also use the brush to add in subtle details that weren’t visible before.
5. Use the crop tool to trim away any unwanted parts of the photo. This is particularly useful if you are trying to focus on a specific part of the image.
6. Use the rotate tool to change the orientation of the photo. You can rotate it clockwise or counterclockwise.
7. Use the contrast tool to increase or decrease the difference between light and dark areas in the photo. This can help make the photo look more dramatic.
8. Use the saturation tool to increase or decrease the intensity of the colors in the photo. This can help make the colors pop or create a more subdued look.
9. When you are happy with the changes you’ve made, click the “Save” button and your photo is ready to share.
By following these steps, you can use Mac’s built-in picture editor to easily enhance your photos. With just a few clicks, you can transform ordinary photos into works of art.
An Overview of the Best Mac Picture Editing Apps
Mac computers are known for their powerful graphic capabilities, and the best Mac picture editing apps make it possible to take advantage of these features. With the help of these apps, users can edit photos, manipulate images, create digital artwork, and more. In this article, we will provide an overview of the best Mac picture editing apps available on the market.
The first app to consider is Adobe Photoshop. This powerful image editor is the industry standard for professional photographers, graphic designers, and illustrators. With it, users can quickly and easily manipulate images, remove unwanted objects, and apply a variety of effects and filters. The app also includes tools for creating digital artwork, such as 3D models and animations.
Another great choice is Pixelmator Pro. This app is a powerful photo editor that offers a variety of tools and features, including advanced color correction, layers, and masking. It also includes a wide range of filters and effects that can be used to improve photos as well as create digital artwork.
The next app is Affinity Photo. This app is designed to be a simpler alternative to Photoshop, but it still offers powerful photo editing capabilities. Users can make quick adjustments to color, tone, and exposure, as well as use layers, masks, and a variety of filters. The app also includes a heal and clone tool, which is great for removing unwanted objects from photos.
Finally, there is Luminar 4. This app is designed for both professional and amateur photographers. It includes a selection of powerful tools for adjusting exposure, color, and other aspects of photos. It also includes a library of filters and effects that can help to improve photos and create digital artwork.
These are just a few of the best Mac picture editing apps available. With these apps, users can easily manipulate images, enhance photos, and create stunning digital artwork.
Tips and Tricks for Creating Professional-Quality Pictures with Your Mac’s Picture Editor
1. Invest in a good quality camera and lens. A good quality camera will take better pictures and allow you to edit them more effectively. Investing in a good quality lens will also help you to capture better images.
2. Understand the power of natural light. Natural light can create more aesthetically pleasing photos than artificial light. When taking pictures, look for natural light sources such as windows or outdoor areas.
3. Use the right exposure settings. To ensure your pictures turn out well, use the correct exposure settings. This means setting the shutter speed, aperture, and ISO depending on the lighting and what you want your picture to look like.
4. Adjust the white balance. The white balance of a picture can make a huge difference in how the image looks. Adjusting the white balance can make a picture look more natural or be more aesthetically pleasing.
5. Play with the contrast and saturation levels. Adjusting the contrast and saturation levels of your picture can help to make it look more professional. Experiment with different levels to see what looks best.
6. Utilize the crop tool. The crop tool can help you to eliminate any distractions or unwanted elements from your photo. It can also help you to focus the viewer’s attention on the main subject of the image.
7. Sharpen the image. If the image looks a bit blurry, you can use the sharpen tool to make it look more crisp and clear. Be careful not to over sharpen the image, as this can make it look unnatural.
8. Utilize the layers feature. Layers can help you to create more complex images by allowing you to combine multiple images into one. This can be used to create collages, add effects, and more.
9. Save your images in the right file format. Different file formats have different benefits. If you’re planning on printing your images, save them in a format such as TIFF or JPEG.
10. Take your time and experiment. Editing photos can take some time, so don’t be afraid to take your time and experiment. Try out different techniques and see what works best for each image.