Google Photos is a powerful image editing app that can help you turn ordinary photos into professional-looking shots. With the help of its advanced editing tools, you can easily enhance your pictures to look their best. Here are some tips for how to use Google Photos to edit your photos like a professional.
- Adjust the Exposure: You may want to adjust the exposure of your photo to make it appear brighter or darker. To do this, open up the photo in Google Photos and select the edit icon. Then, select “Adjust” and move the slider to the left or right to adjust the exposure.
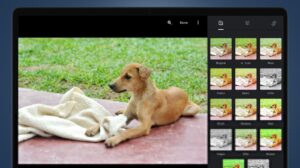
- Add Filters: Filters are a great way to enhance your photos and give them a professional look. To add a filter, select the photo and then select “Filters”. You can then choose from a variety of filters and apply them to your photo.
- Crop and Straighten: Cropping and straightening your photo is a great way to remove any unwanted elements and make it look more professional. To do this, select the photo and then select the “Crop & Rotate” icon. You can then crop and straighten your photo as needed.
- Adjust the Color: You can also adjust the color of your photo to make it look more vibrant or to give it a different feel. To do this, select the photo and then select “Color”. You can then move the sliders to adjust the color of your photo.
By following these steps, you can easily use Google Photos to edit your photos like a professional. With the help of its advanced editing tools, you can easily enhance your pictures and give them a professional look.
Google Photo Editor’s Advanced Features for Photo Editing
Google Photo Editor provides a range of advanced features for photo editing. These features include red-eye removal, cropping, blurring, resizing and straightening.
Red-eye Removal helps to remove the red color that appears in photos due to flash photography. This feature is especially helpful when it is necessary to remove the red eye effect from photos taken in low-light conditions.
Cropping is a feature that allows users to cut out parts of an image, such as a face or a background. This is useful for creating a more focused image or for removing unwanted elements from the photo.
Blurring is a feature that can be used to make an image appear less sharp. This can be used to make the image look more natural or to create a dreamy look.
Resizing allows users to change the size of an image without distorting its proportions. This is useful for adapting an image to fit a specific space or for making an image appear larger or smaller.
Straightening is a feature that allows users to adjust the angle of an image. This is useful when an image has been taken at an angle and needs to be straightened out.
These are some of the advanced features available in Google Photo Editor. These features can make photo editing easier and more efficient.
Essential Tips for Getting the Most Out of Google Photo Editor
- Use the Adjustment Tools: Google Photos Editor has a range of adjustment features for editing photos. They include brightness, contrast, saturation, and other color adjustments, sharpening, and more. By using these tools, you can quickly and easily improve the look of your photos.
- Make Use of Filters: Filters are a great way to give your photos a unique look. Google Photos has a selection of filters to choose from, including vintage, black and white, sepia, and more. You can also adjust the intensity of the filter to get the exact look you want.
- Take Advantage of Cropping and Rotating: Cropping and rotating tools are essential for getting the perfect composition. Google Photos offers tools for cropping and rotating photos. You can also use the crop tool to resize a photo.
- Use the Retouch Tool: The retouch tool is great for quickly fixing small imperfections in your photos, such as red-eye or blemishes. With this tool, you can also remove unwanted objects from the background of your photos.
- Utilize the Drawing Tool: The drawing tool is a great way to add text or doodles to your photos. You can also use it to draw shapes or lines to highlight certain elements in your photo.
- Experiment with Photo Effects: Photo effects can be used to create interesting and unique looks for your photos. Google Photos has a variety of effects, including blur, vignette, and more. You can also adjust the intensity of the effect to get the perfect look.
By following these tips, you can make the most out of Google Photos Editor and get the most out of your photos. With these tools, you can quickly and easily improve the look of your photos and create unique and interesting looks.
Exploring the Creative Possibilities of Google Photo Editor
Google Photos is a powerful and versatile photo editing tool that can help you create beautiful images. With its intuitive interface and wide range of features, Google Photos can provide users with the ability to quickly and easily transform their photos into stunning works of art.
Google Photos offers a variety of editing tools that allow you to make adjustments to your photos. The most basic adjustment you can make is to adjust the brightness and contrast of your image. You can also use the “Enhance” tool to quickly improve the quality of your photo by automatically adjusting the colors, sharpness, and focus.
Google Photos also allows you to apply filters to your photos. You can choose from a variety of preset filters or create your own custom filter. This is a great way to make your photos look more interesting and creative.
In addition to filters, Google Photos also offers a variety of editing tools that allow you to make more precise adjustments to your photos. For example, you can use the “Curves” tool to adjust the levels of brightness and contrast in your photos. You can also use the “Sharpen” tool to make your photos look sharper and clearer.
Google Photos also offers a variety of creative tools that allow you to make more creative adjustments to your photos. For example, you can use the “Blur” tool to give your photos a dreamy, ethereal look. You can also use the “Vignette” tool to darken the edges of your photos and give them a classic film look.
Finally, Google Photos also offers a range of advanced features such as the ability to create collages and panoramas. With these features, you can easily combine multiple photos into a single image. This is a great way to showcase your favorite memories in a unique and creative way.
Google Photos is an incredibly powerful and versatile photo editing tool. With its intuitive interface and wide range of features, Google Photos can provide users with the ability to quickly and easily make creative adjustments to their photos. Whether you’re a beginner or a professional photographer, Google Photos can help you create stunning images.
A Guide to Optimizing Images Using Google Photo Editor
Optimizing images can greatly improve the quality of photos and visuals used in webpages, blogs, and other publications. Google Photo Editor is a powerful and easy-to-use program that can help you quickly and easily optimize your images for the web. This guide will provide a step-by-step overview of how to use Google Photo Editor for image optimization.
Step 1: Choose the Image
The first step to optimizing an image using Google Photo Editor is to choose the image that you want to work with. You can either upload the image from your computer or use an image from Google Photos. Once you have selected the image, click “Edit” in the top right corner of the window.
Step 2: Adjust Brightness and Contrast
The next step is to adjust the brightness and contrast of the image. To do this, click the “Adjust” tab at the top of the window and use the sliders to adjust the brightness and contrast of the image. For web images, it is important to ensure that the image is bright enough to be seen clearly on all types of screens, but not so bright that it appears washed out.
Step 3: Crop the Image
Google Photo Editor also allows you to crop your image. To do this, click the “Crop” tab at the top of the window. You can use the sliders to adjust the size and shape of the crop, or you can select from one of the preset crop sizes. When you are happy with the crop, click “Apply” to save your changes.
Step 4: Resize the Image
Google Photo Editor also allows you to resize your image. To do this, click the “Resize” tab at the top of the window and enter the desired width and height of the image. It is important to ensure that the image is not too large, as this can slow down page loading times.
Step 5: Add a Watermark
If you want to add a watermark to your image, you can use the “Watermark” tab at the top of the window. Here you can upload an image or text to use as a watermark. You can also adjust the opacity and placement of the watermark. Once you are happy with the watermark, click “Apply” to save your changes.
Step 6: Save the Image
Once you have finished optimizing your image, you can save it to your computer. To do this, click the “Save” tab at the top of the window and select the file format that you want to save the image in. It is important to select a file format that is suitable for web use, such as JPEG or PNG. Once you have selected the file format, click “Save” to save the image to your computer.
By following these steps, you can quickly and easily optimize your images using Google Photo Editor. Optimizing images can help improve the look and feel of webpages, blogs, and other publications, so it is important to ensure that your images are properly optimized.