Curves adjustment layers are a powerful tool used by professional image editors to correct and enhance photos. They offer a great deal of control and can be used to adjust the brightness, contrast, and tone of an image. In this guide, we will discuss how to use curves adjustment layers for professional image corrections.
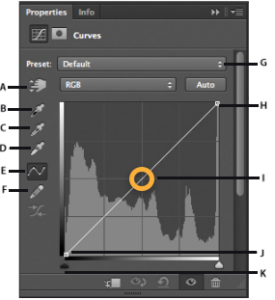
To begin, open the photo you wish to edit in your preferred photo editing software. Create a new curves adjustment layer and select it in the layers panel. The curves adjustment layer gives you access to a graph of the tones in your image. The graph will show you where the darkest and lightest parts of your image are located.
To adjust the brightness and contrast of your image, you will use the curve. To make the image brighter, drag the curve upwards. To make the image darker, drag the curve downwards. You will also have the ability to adjust the midtones, shadows, and highlights of your image by clicking on the curve and dragging it upwards or downwards.
To adjust the tonal range of your image, you can use the sliders located at the bottom of the curves adjustment layer. The sliders allow you to increase or decrease the amount of contrast in your image. For example, if you want to make the image darker, you can drag the black slider to the right. To make the image lighter, you can drag the white slider to the left.
Finally, once you are happy with your adjustments, you can save the curves adjustment layer and apply it to the rest of your images. This will allow you to quickly apply your corrections to a batch of photos, saving you time and effort.
Using curves adjustment layers is a great way to make professional image corrections. With a few simple steps, you can adjust the brightness, contrast, and tonal range of your images with ease. Give it a try and see the results for yourself.
Exploring the Benefits of Non-Destructive Image Corrections in Photoshop
Non-destructive image corrections are techniques and processes used in Photoshop to make adjustments to images without permanently altering the source image. These techniques and processes enable photographers, graphic designers, and other digital artists to make changes to images while preserving the original image as a source document, as well as to allow for easy and efficient experimentation with a range of creative possibilities. In this article, we will explore some of the benefits of non-destructive image corrections in Photoshop.
One of the major advantages of non-destructive image corrections in Photoshop is that the original image remains unaltered. This means that if a mistake is made or an adjustment is not satisfactory, the original image is still available to work from. This allows for an easy and efficient workflow, as the user is able to make numerous adjustments to the image without having to start from scratch.
Another benefit of non-destructive image corrections in Photoshop is that the adjustments made to the image can be changed or undone at any time. This allows the user to experiment with different looks and effects without the worry of permanently altering the source image. It also makes it easier to try out new ideas and techniques, as any adjustments that are not satisfactory can be easily undone.
Finally, non-destructive image corrections in Photoshop make it easier to apply adjustments to multiple images. Once the desired effect is achieved, the user can easily apply the same adjustments to other images, ensuring that all of the images have a consistent look and feel. This is particularly useful when producing a series of images for a project or when creating a portfolio of work.
In conclusion, non-destructive image corrections in Photoshop offer a range of benefits for photographers, graphic designers, and other digital artists. By allowing for easy and efficient experimentation, as well as the ability to apply adjustments to multiple images, these techniques and processes enable users to produce consistent results with minimal effort.
Different Image Correction Techniques for Enhancing Dull Photos
When it comes to digital photography, one of the most common challenges is dealing with dull photos. A dull photo is one that lacks contrast, has muted colors, and generally lacks visual impact. Fortunately, there are a variety of image correction techniques that can be used to help bring dull photos back to life.
One of the simplest and most effective ways to enhance a dull photo is to adjust the contrast levels. In most image editing programs, this is done with a slider or a few simple clicks. Increasing the contrast will darken the shadows and lighten the highlights, while decreasing the contrast will have the opposite effect.
Another effective technique is to adjust the saturation of the colors in the photo. Increasing the saturation will make the colors more vibrant and vivid, while decreasing the saturation will make the colors more muted.
Another way to bring life to a dull photo is to adjust the white balance. White balance is used to adjust the color temperature of a photo, which can be used to make a photo appear warmer or cooler. By adjusting the white balance, you can make a dull photo appear more vibrant and colorful.
Finally, you can also use the “shadows and highlights” tool to adjust the brightness of specific areas of the photo. This can be used to lighten up dark shadows or darken highlights, which can help to bring out the details in a dull photo.
By employing these image correction techniques, you can bring dull photos back to life and make them look their best.