Having the right image size is essential for any social media platform. Incorrectly sized images will not be displayed properly and can be difficult to read. Therefore, it is important to make sure that any images you upload are the correct size for the platform. This article will provide information on how to resize photos for different social media platforms.
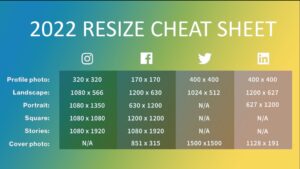
When uploading images to Facebook, it is important to use the recommended image size of 1200 x 630 pixels. This is the ideal size for uploads to your timeline, but images can be slightly larger or smaller and still be accepted. For profile pictures, it is recommended to use an image size of at least 180 x 180 pixels. For group and event images, a size of 1200 x 717 pixels is recommended.
When uploading images to Instagram, the recommended size is 1080 x 1080 pixels. This size is ideal for both square and landscape photos. However, portrait images should be 1080 x 1350 pixels. For profile pictures, the recommended size is 110 x 110 pixels.
When uploading images to Twitter, the recommended size is 1024 x 512 pixels. This size is ideal for both square and landscape photos. However, portrait images should be 440 x 220 pixels. For profile pictures, the recommended size is 400 x 400 pixels.
When uploading images to LinkedIn, the recommended size is 400 x 400 pixels for both square and landscape photos. For profile pictures, the recommended size is 400 x 400 pixels. For header images, the recommended size is 1584 x 396 pixels.
YouTube
When uploading images to YouTube, the recommended size is 1280 x 720 pixels for both square and landscape photos. For profile pictures, the recommended size is 800 x 800 pixels. For channel art, the recommended size is 2560 x 1440 pixels.
Overall, having the correct image size for each platform is essential for creating a professional look and ensuring your images are displayed properly. By following the recommended sizes for each platform, you can ensure your images are displayed correctly and look their best.
The Benefits of Using a Photo Size Editor
A photo size editor is an invaluable tool for anyone who frequently works with digital images. This type of software allows users to easily manipulate the size and orientation of any digital image without sacrificing quality. By using a photo size editor, users can quickly and easily resize images for a variety of uses such as web design, emailing, printing, and more. This makes it a powerful and helpful tool for photographers, graphic designers, and anyone else who frequently works with digital images.
The most obvious benefit of using a photo size editor is that it simplifies the process of resizing images. Without a photo size editor, resizing images can be a long and tedious process involving multiple steps and a variety of software programs. With a photo size editor, users can quickly and easily resize any image to whatever size they need. This saves time and allows users to quickly and easily manipulate images for whatever purpose they need.
Another benefit of using a photo size editor is that it allows users to easily manipulate the orientation of an image. This is particularly helpful for web design and emailing, where images must be resized to fit specific dimensions. With a photo size editor, users can quickly and easily rotate images to fit the desired dimensions without having to manually resize each image. This can save a great deal of time and effort.
Finally, a photo size editor allows users to preserve the quality of their images. Many image editing programs, such as Adobe Photoshop, can reduce the quality of an image when resizing it. With a photo size editor, the quality of the image is preserved, ensuring that any resized images are of the highest quality.
Overall, a photo size editor is an invaluable tool for anyone who frequently works with digital images. It simplifies the process of resizing images, allows users to manipulate the orientation of images, and preserves the quality of the images. For anyone who works with digital images, a photo size editor is an essential piece of software.
Understanding Image Compression and Its Effects on Image Quality
Image compression is a process used to reduce the size of digital image files while maintaining the original quality and resolution. It is a necessary step in the digital workflow, as it allows for faster transmission of images and reduces storage costs. However, it can also have a negative effect on the quality of the image if not done properly.
The most common form of image compression is lossy compression. This type of compression removes unnecessary data from the image, resulting in a smaller file size. While this is beneficial for storage and transmission, it can also lead to a decrease in image quality. Lossy compression removes details that may not be visible to the human eye, but are still important for accurate image representation. This can lead to a loss of color accuracy, sharpness, and overall clarity.
Lossless compression is a form of image compression that does not result in a loss of image quality. It works by analyzing the image and removing redundant information. It is more effective than lossy compression at reducing file size, but it is much slower and more computationally intensive.
When choosing which form of compression to use, it is important to consider the intended use of the image. If the image is being used in a professional or scientific setting, lossless compression is recommended. However, if the image is being used for a casual purpose, such as sharing on social media, lossy compression may be suitable.
In conclusion, image compression is an important step in the digital workflow, as it can reduce file size and increase transmission speed. However, it can also have a negative effect on image quality if not done properly. When choosing a form of image compression, it is important to consider the intended use of the image.
Tips for Optimizing Your Photos for Maximum Impact
- Take advantage of the best light: Natural light is a great way to get the perfect shot for your photos. Make sure to position yourself and your subject in the light at the right time of day.
- Make use of filters: Filters can help add a unique touch to your photos. Consider adding filters to enhance the overall look and feel of your photos.
- Utilize basic photo-editing tools: There are a variety of photo-editing apps and programs that can help you enhance your photos. Consider cropping, adjusting exposure, and making minor adjustments to color and contrast to make your photos look their best.
- Use appropriate resolution: Ensure that your photos are in the right resolution for their intended use. High-resolution photos are best for printing, while lower resolution images are best for web and social media.
- Compress your photos: Compressing your photos can help reduce the file size, making it easier to share them with others.
- Add captions and tags: Adding captions and tags can help increase the visibility of your photos, making them easier to find.
- Optimize for SEO: Utilizing keywords in your captions and tags can help improve your photos’ search engine rankings, making them easier to find by potential viewers.
By following these tips, you can ensure that your photos have maximum impact when shared online. With the right techniques and tools, you can make sure your photos look their best and get the attention they deserve.
The Pros and Cons of Different Photo Resizing Techniques
When it comes to resizing photos, there are a variety of techniques available. Each technique has its own pros and cons, and it is important to understand the differences between them in order to make an informed decision about which one is best for your needs.
The first technique is cropping. This technique involves reducing the size of a photo by cutting out parts of the image. The advantage of this technique is that it allows you to focus on the most important parts of the photo, while removing any unnecessary elements. However, there is a downside to this technique. By cropping a photo, you can lose important details and reduce the quality of the image.
The second technique is scaling. This technique involves reducing the size of the photo by changing the resolution. The advantage of this technique is that it allows you to keep the original proportions of the photo intact. However, the downside is that the quality of the image may be reduced due to the change in resolution.
The third technique is resampling. This technique involves changing the size of the photo by resampling the pixels. The advantage of this technique is that it allows you to maintain the highest possible quality of the image. However, the downside is that it can take longer to process than other techniques.
Finally, the fourth technique is compression. This technique involves reducing the size of the photo by removing unnecessary data from the image. The advantage of this technique is that it is the fastest of all the techniques. However, the downside is that it can reduce the quality of the image.
Overall, it is important to understand the pros and cons of each photo resizing technique in order to make an informed decision about which one is best for your needs. Each method has its own advantages and disadvantages, and it is important to take these into account when deciding which technique is best for you.