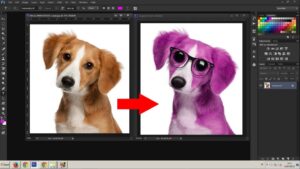
Changing the color of an image using Adobe Photoshop can be done using a few simple steps.
- Open your image in Photoshop.
- Select the layer of the image you want to change.
- Select the Adjustment Layer icon in the Layers Palette.
- Select the Hue/Saturation option from the list of adjustment layers.
- Drag the Hue slider to the desired color.
- Adjust the Saturation and Lightness sliders to achieve the desired effect.
- Click OK when you are satisfied with the result.
Your image should now be changed to the desired color. If you need to make further adjustments to the image, you can use the Hue/Saturation adjustment layer again.
How To Change Colors in an Image Using GIMP
Using GIMP to change colors in an image is a straightforward process. GIMP (GNU Image Manipulation Program) is a free and open-source image editor that is available for Windows, macOS, and Linux. It is a powerful tool for changing colors in an image, as it allows for a wide range of adjustments and corrections.
To begin, open the image you wish to edit in GIMP. Once the image is open, select the “Colors” menu. From the drop-down menu, select “Hue-Saturation”. This will open a dialog box with various options.
The Hue slider allows you to adjust the overall color of your image. This feature is useful for adjusting the balance of colors in an image. You can move the slider left or right to adjust the hue, or up and down to adjust the saturation.
The Lightness slider allows you to adjust the brightness of an image. Move the slider left to darken the image, or right to lighten it.
The Color Balance tool allows you to adjust the balance of colors in an image. This can be useful for creating a monochromatic effect, or for adjusting the overall color of an image.
The Colorize tool allows you to adjust the hue and saturation of an image. This can be used to create a colored tint in an image, or to change its overall color.
The Selective Color tool allows you to adjust the colors of specific areas of an image. This is useful for changing the colors of individual objects.
Finally, the Color Curve tool allows you to adjust the tonal range of an image. This is useful for adjusting the contrast of an image, or for creating a unique effect.
Using GIMP, you can easily adjust the colors of an image. With its powerful tools and features, GIMP is a powerful and versatile tool for editing and manipulating images.
Best Tips & Tricks for Changing the Color of an Image in Illustrator
- Select the image that you want to change the color of. You can do this by using the Selection Tool (V) or Direct Selection Tool (A).
- Go to the Swatches panel in the right-hand toolbar. Select a color that you want to use for the image.
- Select the Live Paint Bucket Tool (K) from the toolbar. Click on the image that you want to change the color of. This will fill the image with the color that you have selected from the Swatches panel.
- If you want to adjust the color of the image, go to the Color panel in the right-hand toolbar. Choose either CMYK or RGB for the Color Mode and make adjustments to the values.
- If you want to create a color palette for the image, go to the Color Guide panel in the right-hand toolbar. Select the color you want to use and click on the “Create Color Group” button. This will create a color palette for the image.
- If you want to change the color of only certain parts of the image, select the Live Paint Selection Tool (Shift + K) from the toolbar. This will allow you to select the parts of the image that you want to change. You can then use the Live Paint Bucket Tool (K) to fill those parts with the color of your choice.
- If you want to create a gradient of colors for the image, select the Gradient Tool (G) from the toolbar. Click and drag across the image to create a gradient. You can then adjust the colors of the gradient in the Color panel.
A Guide To Changing Colors in Vector Images Using Inkscape
Changing colors in vector images using Inkscape is a relatively straightforward process. Inkscape is a powerful vector graphics editor that is used to create and edit vector images, which are composed of lines, shapes, and points. With Inkscape, you can easily change the colors of vector images, adding texture, texture fills, and gradients.
To start, you will need to open the vector image you want to edit in Inkscape. You can do this by clicking on the “File” menu and selecting “Open.” Select the vector image and click “Open.” The vector image should now be loaded into Inkscape.
Once the vector image is loaded into Inkscape, you can begin to change the colors. First, select the object you want to change the color of. This can be done by clicking on the object in the image. The object will now be highlighted, indicating it has been selected.
Once you have selected the object, you can begin to change the color. To do this, click on the “Fill and Stroke” icon in the toolbar, located at the top of the Inkscape window. This will open a tab, where you can select a color from the list. You can also click on the “Color Picker” icon to select a custom color.
Once you have selected the color you want, click on the “Fill and Stroke” tab again, and select the type of texture you want to apply to the object. You can choose from a variety of textures, including solid color, gradient, or texture fill.
Once you have chosen the texture, you can adjust the various settings to create the desired effect. For example, if you are using a gradient texture, you can adjust the angle, width, and height of the gradient. If you are using a texture fill, you can adjust the scale and rotation of the texture.
When you are satisfied with the changes you have made, you can click on the “Apply” button to save your changes. Now, the object you have selected should have been changed to the new color you selected. You can repeat the steps above to change the color of additional objects in the vector image.
By following these steps, you can easily change the colors of vector images using Inkscape. With this powerful graphics editor, you can quickly and easily create and edit vector images with a variety of textures and colors.
Creative Ways to Adjust Colors in an Image with Pixlr
- Color Balance: The Color Balance tool in Pixlr can be used to adjust the midtones, highlights, and shadows of an image to bring out the desired colors. To access the Color Balance tool, select Adjustment > Color Balance. To adjust the colors, simply move the sliders left or right, and watch the changes take place in real-time.
- Colorize: The Colorize tool can be used to apply a single color to an entire image. To access the Colorize tool, select Adjustment > Colorize. To adjust the colors, move the sliders left or right while watching the effects in real-time.
- Hue/Saturation: The Hue/Saturation tool can be used to adjust the hue, saturation, and lightness of an image. To access the Hue/Saturation tool, select Adjustment > Hue/Saturation. To adjust the colors, move the sliders left or right while watching the effects in real-time.
- Curves: The Curves tool can be used to adjust the levels of color and contrast in an image. To access the Curves tool, select Adjustment > Curves. To adjust the colors, click on the curve line to create anchor points, and then drag them up or down to increase or decrease the levels of color and contrast.
- Replace Color: The Replace Color tool can be used to select a specific color in an image and replace it with a new color. To access the Replace Color tool, select Adjustment > Replace Color. To adjust the colors, click on the color selection tool to select the color you wish to replace, and then move the Hue, Saturation, and Lightness sliders to adjust the new color.