The Samsung Photo Editor app is a powerful, versatile tool for editing photos on your Samsung device. With its simple user interface and wide range of features, it is the perfect choice for creating stunning photos. This guide will provide a comprehensive overview of using the Samsung Photo Editor app.
Getting Started
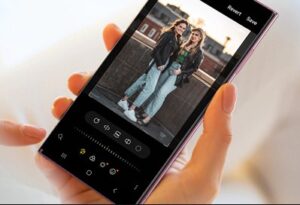
To get started, open the Samsung Photo Editor app on your device. You will be presented with your photo library, where all your photos are stored. Tap on the photo you want to edit, then tap the “Edit” button at the bottom of the screen.
The editor interface will appear, giving you access to all the tools and features you need to edit your photo. At the top of the screen, you will see the “Tools” tab. Here, you can access the various tools and features of the app, including cropping, exposure, color and saturation, filters, frames, and more.
Cropping
The cropping tool is used to trim away portions of the photo that are unwanted. To use it, tap the “Crop” option in the “Tools” tab. You will be presented with a grid that you can use to select the area of the photo you want to keep. You can also rotate and resize the photo to get the perfect crop.
Exposure
The exposure tool is used to adjust the brightness, contrast, and other aspects of the photo’s exposure. To use it, tap the “Exposure” option in the “Tools” tab. You can then adjust the exposure levels by moving the sliders.
Color and Saturation
The Color and Saturation tool is used to adjust the color and saturation of the photo. To use it, tap the “Color and Saturation” option in the “Tools” tab. You can then adjust the color and saturation levels by moving the sliders.
Filters
The Filters tool is used to add various effects to your photo. To use it, tap the “Filters” option in the “Tools” tab. You can then choose from a variety of filters to apply to your photo.
Frames
The Frames tool is used to add a frame to the photo. To use it, tap the “Frames” option in the “Tools” tab. You can then choose from a variety of frames to apply to your photo.
Saving and Sharing
Once you are done editing your photo, you can save it to your device or share it with others. To save it, tap the “Save” button at the top of the screen. To share it, tap the “Share” button at the top of the screen. You can then choose how you want to share the photo.
Conclusion
The Samsung Photo Editor app is a powerful, versatile tool for editing photos on your Samsung device. With its simple user interface and wide range of features, it is the perfect choice for creating stunning photos. This guide has provided a comprehensive overview of using the Samsung Photo Editor app.
Exploring the New Features of the Latest Samsung Photo Editor
The Samsung Photo Editor is an impressive piece of software that can be used to edit and enhance digital images. This latest version of the software offers users a range of new features that can help them to further refine their photos with ease. In this article, we will explore some of the new features of the Samsung Photo Editor and how they can be used to improve your photography.
The first new feature of the Samsung Photo Editor is the ability to quickly adjust the exposure of your photos. This feature enables you to adjust the brightness and darkness of your photos with just a few clicks. You can also adjust the shadows and highlights of your photos to create more dramatic effects.
The second new feature of the Samsung Photo Editor is the ability to easily remove unwanted objects from your photos. This feature allows you to remove unwanted people, objects, or backgrounds from your photos with ease. You can also use this feature to blur out or soften unwanted elements in your photos.
The third new feature of the Samsung Photo Editor is the ability to quickly and easily apply filters to your photos. This feature allows you to add special effects to your photos with just a few clicks. You can choose from a range of pre-made filters or you can create your own unique filters to give your photos a unique look.
The fourth new feature of the Samsung Photo Editor is the ability to easily adjust the color balance of your photos. This feature enables you to change the hue, saturation, and brightness of your photos with ease. You can also adjust the white balance of your photos to enhance their clarity.
Finally, the fifth new feature of the Samsung Photo Editor is the ability to quickly and easily straighten your photos. This feature allows you to rotate and resize your photos with just a few clicks. You can also adjust the tilt and rotation of your photos to get the exact look you are aiming for.
Overall, the latest version of the Samsung Photo Editor offers users a range of new features that can help them to further refine their photos with ease. Whether you are a beginner or a professional photographer, these new features can help you to take your photography to the next level.
How to Create Professional-Looking Photos with the Samsung Photo Editor
Taking professional-looking photos with the Samsung Photo Editor is easy and can help you create beautiful photos that you can share with friends and family. Here’s how to get started:
- Open the app. To open the Samsung Photo Editor, locate and tap on the app on your device.
- Choose a photo. Select one of your photos from the gallery or take a new one with the camera to start editing.
- Adjust the image. To adjust the image, use the tools on the right-hand side of the screen. You can crop, rotate, adjust the brightness, and more.
- Add effects. There are a variety of effects you can add to your photo to make it look more professional. You can add filters, frames, text, and more.
- Save and share. When you’re finished editing, save your photo to your device. You can also share it directly to social media or email it to someone.
Using the Samsung Photo Editor, you can easily create professional-looking photos in a few simple steps. With the right adjustments and effects, you can create beautiful photos that you can share with friends and family.
Tips and Tricks for Getting the Most Out of the Samsung Photo Editor
- Utilize Advanced Editing Tools: The Samsung Photo Editor has a wide variety of advanced editing tools to enhance photos. These tools can be accessed by tapping the ‘Edit’ icon at the bottom of the screen, then selecting ‘Advanced.’ From here, users can access tools such as Brightness, Contrast, Hue, and Saturation.
- Take Advantage of Filters: The Samsung Photo Editor has a range of filters that can be used to enhance the overall look of a photo. To access these filters, tap the ‘Edit’ icon at the bottom of the screen, then select ‘Filter.’ From here, users can choose from a range of filter options to make their photos stand out.
- Utilize the ‘Auto Adjust’ Feature: One of the most useful features of the Samsung Photo Editor is its ability to automatically adjust the settings of a photo to create the best possible version of the image. This feature can be accessed by tapping the icon with the three dots in the top right corner of the screen, then selecting ‘Auto Adjust.’
- Use Presets as a Starting Point: The Samsung Photo Editor also has a range of presets that can be used to quickly apply a range of settings to a photo. To access these presets, tap the ‘Edit’ icon at the bottom of the screen, then select ‘Preset.’ From here, users can choose from a range of preset options to give their photos a professional look.
- Utilize Crop and Resize Tools: The Samsung Photo Editor also has a range of crop and resize tools to help users create the perfect composition for their photos. To access these tools, tap the ‘Edit’ icon at the bottom of the screen, then select ‘Crop/Resize.’ From here, users can adjust the size and shape of their photos as needed.
- Utilize the Undo and Redo Features: The Samsung Photo Editor also has an ‘Undo’ and ‘Redo’ feature that can be used to quickly undo or redo any changes made to a photo. To access these features, tap the icon with the two arrows in the top right corner of the screen. This feature can be used to quickly make adjustments to a photo.
By utilizing these tips and tricks, users can get the most out of the Samsung Photo Editor and create stunning photos.
Comparing the Samsung Photo Editor to Other Popular Photo Editing Programs
When it comes to editing photographs, today’s digital cameras have given photographers more tools than ever before to create beautiful images. One of the most popular photo editing programs is Samsung’s Photo Editor. This powerful program offers a variety of features that make it an attractive choice for photographers of all skill levels.
The Samsung Photo Editor allows users to make adjustments to their photos such as cropping, resizing, adjusting color balance, and adding text and effects. It also offers features like red-eye removal and blemish removal. Additionally, the program has an array of filters, frames, and effects that can be applied to photos to give them a unique look.
When compared to other popular photo editing programs, Samsung’s Photo Editor stands out for its comprehensive suite of features. Many of the other programs have fewer tools and aren’t as easy to use. For instance, Adobe Photoshop offers a wide range of features but can be intimidating for beginners. Apple’s iPhoto is easier to use but lacks some of the more advanced features found in the Samsung Photo Editor.
In conclusion, the Samsung Photo Editor is an excellent choice for photographers of all skill levels. It offers an extensive set of features and is relatively easy to use. When compared to other popular photo editing programs, it stands out for its comprehensive suite of features and ease of use.