Adobe Photoshop is a powerful photo editing software program used by professionals and amateur photographers alike. It is the industry standard for creating and manipulating digital images, and it has been around for over 25 years. With its wide range of tools and features, it can be used to create stunning effects and enhancements to any image.
Adobe Photoshop is available for both PC and Mac. It is accessible for both beginners and experts, as it has an intuitive user interface that makes it easy to navigate. It also includes a wide selection of pre-made templates and tutorials to help you get started.
Photoshop allows you to edit images in a variety of ways. You can adjust the brightness, contrast, color saturation, and hue. You can also combine multiple images to create collages and montages. You can also add text, shapes, and special effects to your images. Additionally, Photoshop can be used to edit videos, create high-resolution graphics, and design websites.
Photoshop also has a wide range of features that make it easy to share your work. You can easily share your photos with others via social media, email, and various cloud-based services. You can also print your images onto physical products such as cards and canvases.
Adobe Photoshop is an incredibly powerful tool that can be used to create amazing digital art. Whether you are a beginner or an expert, it has all the features you need to make your photos look their best.
Exploring the Creative Power of Adobe Photoshop: Understanding the Benefits of Using this Photo Editor
Adobe Photoshop is one of the most popular and powerful photo editing software applications available today. It has become the industry standard for professionals as well as casual users seeking to create and manipulate digital images. With its vast array of features, Photoshop can be used to create stunning works of art, as well as to retouch photos, add effects and optimize images. Understanding the various features and benefits of the program can help individuals unlock the creative potential of this powerful software.
Photoshop offers a wealth of features that allow users to manipulate images to their liking. These features include the ability to crop and resize images, adjust color and contrast, add text, and apply a wide range of effects. Additionally, Photoshop provides tools for sharpening and blurring images, creating complex selections and masks, as well as merging multiple images together. This vast array of features can be used to enhance or completely transform an image.
Photoshop also offers non-destructive editing capabilities, meaning that any changes made to an image can be reversed or adjusted at any time. This allows you to experiment freely, without having to worry about permanently altering an image. Photoshop also makes it easy to save and share your creations. You can save your images in various formats, such as JPEG, TIFF and PNG, and you can share them with other users through email, social media or online galleries.
Overall, Adobe Photoshop is an incredibly powerful tool for creating and manipulating digital images. With its vast array of features and non-destructive editing capabilities, it provides users with an almost limitless amount of possibilities for creativity. Understanding the various features and benefits of the program can help individuals unlock the creative potential of this powerful software.
Tips and Tricks for Editing Photos with Adobe Photoshop: How to Optimize Your Images with the Right Tools
1. Use the Crop Tool to Remove Unwanted Areas: The Crop Tool allows you to remove unwanted parts of the image and adjust the perspective. You can crop to a specific size and aspect ratio as well.
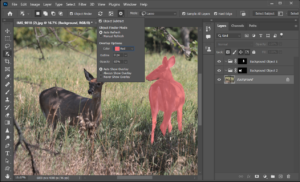
2. Use the Select and Mask Tool to Refine Edges: The Select and Mask Tool allows you to refine edges and make precise selections. You can also adjust the opacity of the selection for more accurate results.
3. Use the Clone Stamp Tool to Remove Unwanted Details: The Clone Stamp Tool is great for removing unwanted details such as dust and scratches. You can also use it to remove blemishes and other minor imperfections.
4. Adjust the Lighting with the Curves Tool: The Curves Tool lets you adjust the brightness, contrast, and color of your image. You can lighten or darken specific areas, or change the overall tone of the image.
5. Use the Sharpen Tool to Enhance Details: The Sharpen Tool lets you adjust the sharpness and clarity of your image. You can also adjust the amount of sharpening applied to specific areas.
6. Use the Blur Tool to Create Depth of Field: The Blur Tool lets you soften specific areas of your image to create a shallow depth of field effect. You can also use it to add texture to your image.
7. Adjust Color with the Hue/Saturation Tool: The Hue/Saturation Tool lets you adjust the color and saturation of your image. You can change the overall color, as well as specific hues and tones.
8. Add Vibrance with the Vibrance Tool: The Vibrance Tool lets you adjust the intensity of the colors in your image. You can make subtle adjustments to the overall vibrancy for a more dynamic look.
9. Adjust the Brightness with the Brightness/Contrast Tool: The Brightness/Contrast Tool lets you adjust the brightness and contrast of your image. You can make subtle adjustments for more natural results.
10. Save Your Work: Don’t forget to save your work after you’ve finished editing. Photoshop supports a variety of file formats including PSD, TIFF, and JPEG.
Going Beyond the Basics with Adobe Photoshop: Advanced Techniques that Will Take Your Image Editing to the Next Level
Adobe Photoshop is one of the most commonly used photo editing and manipulation software available today. It offers users a wide range of tools for making the most of their photos. One of the key aspects of getting the most out of Photoshop is understanding the different file formats it supports and how to use them.
Photoshop supports a variety of file formats, including the most common ones, such as JPEG and PNG. JPEG is a lossy format, meaning that some of the image’s data is lost when the image is saved in this format. JPEG is suitable for web graphics and digital photos, as it can be compressed to a smaller size. PNG, on the other hand, is a lossless format, meaning that no data is lost when the image is saved in this format. PNG is suitable for graphics that need to retain all of the image’s data, such as logos and illustrations.
Other file formats supported by Photoshop are PSD, PDF, TIFF, and RAW. PSD is a native file format for storing layered images, meaning that the layers are retained when saved in this format. PDF is a versatile format for viewing, printing, and sharing documents. TIFF is a lossless format used for high-quality printing. RAW is a file format for storing unprocessed digital images, which allows for greater control when editing the image.
No matter which file format you choose, it is important to understand the advantages and disadvantages of each. Knowing which file format to use for different situations is the key to making the most of your photos in Adobe Photoshop.
Working with Layers in Adobe Photoshop: Utilizing This Powerful Feature to Create Professional-Level Photos
Layers are one of the most powerful features of Adobe Photoshop. They provide a flexible way to work with images, allowing users to create professional-level photos with ease. By taking advantage of layers, users can make adjustments to individual elements of their images without affecting the entire composition. This article will provide an overview of how to use layers and the different types available in Photoshop.
When working with layers in Photoshop, it is important to understand the different types available. There are four primary types of layers: Normal, Adjustment, Fill, and Vector. Normal layers are the most commonly used type, allowing users to make changes to their images without affecting the entire composition. Adjustment layers are used to apply adjustments to the entire image. Fill layers are used to fill areas with color or patterns, while vector layers are used to create vector shapes and paths.
To begin working with layers, users should first create a new layer. This can be done by pressing the “New Layer” button at the bottom of the Layers panel. From here, users can select the type of layer they want to create, such as Normal, Adjustment, Fill, or Vector. Once the layer is created, users can then make adjustments to it, such as changing its opacity, blending mode, and color.
When working with multiple layers, it is important to keep them organized. Photoshop provides several ways to do this, such as grouping and nesting layers. Grouping layers allows users to keep related layers together, while nesting layers allows users to collapse multiple layers into a single layer. This makes it easier to find and adjust individual elements within the composition.
Finally, it is important to save any changes made to a layer. To do this, users should select the layer and then press the “Save” button at the bottom of the Layers panel. This will save any changes made to that layer, allowing users to go back and make further adjustments if needed.
By understanding how to work with layers in Adobe Photoshop, users can create professional-level photos with ease. By taking advantage of the different types of layers available, users can make adjustments to individual elements of their images without affecting the entire composition. With a little practice, users can quickly master this powerful feature and use it to create stunning images.