Photo editing software is becoming increasingly popular as photographers and hobbyists alike look for ways to quickly and easily make improvements to their photos. Luminar is one such program that offers a range of features designed to enhance the look of your images. This beginner’s guide will provide an overview of how to use Luminar to create beautiful photographs.
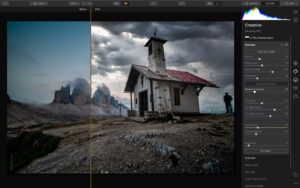
First, you will want to familiarize yourself with the Luminar interface. There are several panels that can be opened and closed, each working together to provide an intuitive editing experience. The tools panel houses the tools necessary to make adjustments to your photos, such as color adjustments and sharpening. The layers panel allows you to add and edit layers to your image, allowing you to create more complex edits. The presets panel contains pre-made filters that can be applied with one click. Finally, the history panel allows you to quickly undo or redo changes you have made.
Next, you will want to begin making adjustments to your photos. You can use the tools panel to make adjustments to the exposure, color, and sharpness of your photo. There are also a variety of filters that can be applied to give your photos a unique look. If you are looking for more precise adjustments, you can use the layers panel to add and edit layers to your image. This allows you to make adjustments to specific areas of the photo, such as the sky or foreground.
Finally, you can use the presets panel to quickly apply pre-made filters to your photos. These filters are designed to give your photos a unique look and can be applied with one click.
With this beginner’s guide, you should now be able to get started using Luminar to edit your photos. With its intuitive interface and powerful tools, Luminar can help you create stunning photographs.
The Benefits of Using Luminar for Professional Photo Editing
Luminar is a professional photo editing software that offers a range of features and benefits to help photographers create beautiful, high-quality images. The software is easy to use and offers a variety of tools that can help professionals to quickly and efficiently edit their photos. Here are some of the key benefits of using Luminar for professional photo editing.
First and foremost, Luminar offers advanced editing tools that can help professionals to make their images look their best. The software includes a range of features that allow users to adjust color, brightness, contrast, and other elements of their photos. These tools can be used to create stunning images with perfect lighting and composition.
Luminar also offers a range of creative tools that can help professionals to add effects and make their images stand out. The software includes a range of filters, textures, and other effects that can be applied to images to give them a unique look. These tools can also be used to quickly add borders, frames, and other elements to images.
In addition, Luminar comes with a range of automated tools that can help professionals to save time when editing images. For example, the software includes a number of presets that can be used to quickly apply effects and adjustments to images. This can help professionals to quickly edit large batches of photos without having to manually adjust each image.
Finally, Luminar is affordable and easy to use. The software is available for both Mac and Windows and comes with a range of tutorials and support materials to help users get the most out of the software. This makes it an ideal choice for professionals who need a powerful and easy to use photo editing solution.
Using Luminar for professional photo editing can help photographers to quickly and efficiently edit their images and create stunning visuals. The software is packed with powerful tools that allow users to make adjustments to color, contrast, brightness, and other elements of their photos. In addition, the software includes a range of creative tools and automated presets that can help save time when editing images. All of these features make Luminar an ideal choice for professionals who need a powerful and easy to use photo editing solution.
How to Achieve Professional Results with Luminar
Luminar is a powerful post-processing software that helps photographers achieve professional results in their images. With its wide range of tools, it is possible to quickly and easily edit your photos to create stunning works of art. In this article, we will cover some of the best tips and tricks for achieving professional results with Luminar.
First, it is important to understand the basics of the program. Luminar uses a layered approach to editing, which allows you to apply different adjustments to different parts of the image. This allows you to achieve more precise results than with traditional editing software. Once you understand the layering system, you can begin to apply adjustments to your images.
Once you have the basics down, it is important to understand the various tools and adjustments available to you in Luminar. These include color correction, sharpening, contrast, clarity, and more. You can also apply creative presets to give your images a unique look.
When making adjustments, it is important to use a light touch. Too much adjustment can lead to a distorted or unnatural-looking image. It is also important to use the “before and after” view to compare your adjustments to the original image. This will help you ensure that you are not over-editing your images.
Finally, it is important to use the export settings to save your image in the correct format. Luminar allows you to save your images in a variety of formats, including JPEG, PNG, TIFF, and PSD. It is important to choose the correct format for your image in order to achieve the best results.
By following these tips and tricks, you can achieve professional results with Luminar. With its wide range of tools and adjustments, you can quickly and easily edit your photos to create stunning works of art.
Exploring the New Features of Luminar 4
Luminar 4 is the latest edition of Skylum’s photo editing software, bringing with it a host of new features, including advanced AI-driven tools, an advanced workspace, and the ability to customize your experience. In this article, we will explore the new features of Luminar 4 and how they can help you take your photography to the next level.
The first major feature of Luminar 4 is the introduction of AI-driven tools, which are designed to help you quickly and easily enhance your photos. With AI-powered tools such as sky replacement, object removal, and automatic sky enhancer, you can quickly and easily retouch your photos. Additionally, Luminar 4 features an advanced workspace that allows you to customize your experience and make the most of the AI-driven tools. This workspace allows you to access your favorite tools and presets quickly and easily, making photo editing faster and more efficient.
Another major feature of Luminar 4 is the introduction of Accent AI 2.0, which is an advanced AI-driven tool that can automatically analyze your photos and apply the perfect adjustments to make them look their best. This tool can be used to quickly and efficiently enhance colors, lighting, and details, resulting in stunning photos that are sure to impress.
Finally, Luminar 4 features a new look and feel, with a modern and intuitive user interface that makes photo editing simpler and more enjoyable. In addition to the user interface, Luminar 4 also features a variety of tutorial videos and online resources that can help you maximize the power of the software.
Overall, Luminar 4 is an incredibly powerful photo editing tool that can help you take your photography to the next level. With its powerful AI-driven tools, advanced workspace, and intuitive user interface, it is no wonder why Luminar 4 is quickly becoming one of the most popular photo editing programs available.
Tips for Enhancing Your Photos with Luminar
1. Utilize Presets: Presets are a great way to quickly enhance your photos with Luminar. There are a variety of presets available, from basic adjustments to more advanced looks. Presets can give you a jump start on editing and help you achieve a desired look faster.
2. Adjust Exposure: Exposure is an important factor in photo editing and Luminar allows you to adjust it easily. You can adjust the exposure, highlights, shadows, whites, and blacks to get the desired effect. You can also use exposure blend mode to add a subtle amount of exposure to your photos.
3. Adjust Colors: Colors can have a huge impact on the overall look of your photos. Luminar allows you to adjust hue, saturation, and luminance to enhance the colors in your photos. You can also apply color filters and temperature adjustments to add a unique look to your photos.
4. Add Effects: Luminar has a variety of effects that you can apply to your photos. These effects range from vignettes to split toning to film grain. You can also add textures to your photos to give them a unique look.
5. Retouch: Luminar also has a retouching tool that you can use to remove blemishes and imperfections from your photos. You can also use the retouching tool to brighten eyes and whiten teeth. This can make a huge difference in the overall look of the photo.
6. Sharpen: Sharpening is an important part of photo editing and Luminar has a great sharpening tool. You can adjust the amount of sharpening, as well as the radius and threshold. This will help to bring out the details in your photos and make them look more professional.
Following these tips will help you to get the most out of Luminar and enhance your photos. With practice, you’ll be able to quickly and effectively edit your photos and achieve amazing results.
How to Create Stunning Effects with Luminar’s Filters and Presets
Luminar is a powerful image editing software that can help you create stunning effects with its range of filters and presets. In this article, we will discuss the different tools available in Luminar and how to use them to create beautiful and eye-catching images.
The first step is to choose a filter or preset that best suits your image. The filters and presets range from subtle to dramatic to create different looks. You can also adjust the intensity of the filter or preset to get the desired effect.
Once you have selected the filter or preset, you can then start to customize it. You can adjust the color, the contrast, the sharpness, the highlights, the shadows, and much more. This will help you create a unique look for your image.
Next, you can use the masking tools in Luminar to precisely control which parts of your image receive the effects. This allows you to create more detailed effects that really make your image stand out.
Finally, you can use the finishing touches in Luminar to further refine your image. You can use the vignette and dodging and burning tools to add more depth and drama to your images.
These are just a few of the ways you can use the filters and presets in Luminar to create stunning effects. With practice, you can develop your own unique style and create beautiful images that will draw attention and awe.