1. Acquire Photo Editing Software
The first step to creating professional-looking photos using photo editing software is to acquire the software. There are a variety of software options available, from free online options to professional programs. When selecting a program, it is important to consider the user’s skill level and the desired results.
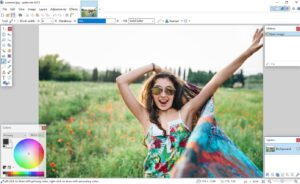
2. Upload the Photo
Once the software has been acquired, the next step is to upload the photo. Depending on the program, the photo can be uploaded from a file or directly from a digital camera.
3. Make Adjustments
The next step is to make adjustments to the photo as needed. This may include cropping, adjusting the exposure and brightness, or adding filters. The user should experiment with the available tools to achieve the desired look.
4. Add Effects
Once the basics have been adjusted, the user can then add effects to the photo. This may include adding text, frames, or other graphical elements. Depending on the software, there may be a wide range of effects available.
5. Save and Share
The last step is to save the photo and share it with others. Depending on the program, the user may be able to save the photo in a variety of formats. The photo can then be shared via social media, email, or other methods.
By following these five steps, anyone can create professional-looking photos using photo editing software. With a little practice and experimentation, users can easily create stunning photos.
How to Use Photo Editing Apps to Enhance Your Photos
Photo editing apps are becoming increasingly popular for enhancing and improving photos. These apps allow users to make a range of changes to their images, such as cropping, adjusting brightness and contrast, adding filters, and more. With the right photo editing app, users can dramatically improve the quality of their photos and create beautiful images that stand out from the rest.
Before using any photo editing app, it is important to select one that is suitable for the desired result. There are a variety of photo editing apps available, each offering different features and capabilities. Some are better suited to basic editing, while others offer more advanced features such as layers and masking tools. It is important to read reviews and research the features of different apps to ensure that the right one is chosen for the job.
Once the right photo editing app is chosen, the next step is to make the desired changes to the photo. Most photo editing apps offer a range of tools for adjusting exposure, color, contrast, saturation, and more. It is important to experiment with these tools to find the perfect balance for the photo. Additionally, most photo editing apps have filters and effects that can be applied to photos to add a unique look.
When making adjustments to a photo, it is important to remember that less is more. Resist the temptation to make drastic changes as this can lead to an unnatural-looking image. Instead, focus on subtle adjustments and fine-tuning the photo until it looks just right.
Finally, save the edited image in a suitable image format. This will ensure that the image is compatible with all devices and programs. Additionally, it is important to save the original image separately in case any mistakes are made while editing.
By following these steps, users can easily use photo editing apps to enhance their photos and create stunning images.
Essential Tips for Beginner Photo Editors on How to Make Your Photos Stand Out
1. Utilize Contrast: Contrast is an important tool for making photos stand out. Use contrast to make colors, shapes, and objects stand out from the background. For example, you can adjust the exposure of an image to increase or decrease the difference between the light and dark elements.
2. Use Natural Light: Natural light is the best way to create a stunning photo. Try to use natural light when taking photos and, if necessary, use a reflector or other tools to bounce the light back into the scene.
3. Tell a Story: Photos should tell a story and evoke emotion. Think about the mood you want to create in your photos and use elements within the photo to help tell the story.
4. Pay Attention to Composition: The composition of a photo is the foundation of any good photo. Pay attention to the rule of thirds, leading lines, and other composition techniques to make your photos stand out.
5. Use Sharpening Tools: Sharpening is an important tool for making photos look more vibrant and crisp. When necessary, use sharpening tools within your photo editing software to bring out the details in your photos.
6. Experiment with Filters: Filters are a great way to add interest and style to a photo. Experiment with different filters to find the look that best suits your photo.
7. Add Depth of Field: Depth of field is the amount of focus in an image. Use depth of field to draw attention to the subject of your photo and minimize distractions.
8. Play with Color: Color is a powerful tool for creating emotion in a photo. Play with the colors of your photo to create the mood you are looking for.
9. Utilize Cropping: Cropping can help you focus on the elements of your photo that you want to stand out. Experiment with different crops to find the one that best suits the photo.
10. Have Fun: Photo editing can be an enjoyable experience. Don’t be afraid to experiment with different techniques and have fun with it.
A Guide to Photo Editing with Adobe Photoshop
Adobe Photoshop is a powerful and versatile photo editing tool for professionals and hobbyists alike. This guide explores the features and tools available in Adobe Photoshop, providing an overview of how to use the software to enhance images.
Getting Started
The first step to editing photos in Adobe Photoshop is to open the image you wish to edit. This can be done by selecting File > Open. Then, you can choose the image you want to edit from your computer.
The next step is to become familiar with the Photoshop interface. Photoshop’s main workspace is divided into three areas: the Menu Bar, the Tool Bar, and the Document Window. The Menu Bar contains a variety of menus that allow you to access various features and tools. The Tool Bar contains a variety of tools that allow you to select, move, and edit pixels in your image. The Document Window is where you can see your image and make adjustments.
Basic Photo Editing
Once you have opened your image and become familiar with the Photoshop interface, you can begin to make edits. The first step is to adjust the image’s brightness and contrast. To do this, select the Image > Adjustments > Brightness/Contrast menu option. This will open a window where you can adjust the brightness and contrast of your image.
Adobe Photoshop also provides a set of powerful image manipulation tools. These tools allow you to make adjustments such as cropping, rotating, and resizing your image. To access these tools, select the Image > Transform menu option. This will open a window with a variety of tools that allow you to make these adjustments.
Advanced Photo Editing
Adobe Photoshop also provides a variety of advanced photo editing tools. These tools allow you to make more complex adjustments such as color correction, retouching, and masking. To access these tools, select the Image > Adjustments menu option. This will open a window with a variety of tools that allow you to make advanced adjustments to your image.
Conclusion
Adobe Photoshop is a powerful and versatile photo editing tool. This guide has provided an overview of how to use the software to enhance images. By following these steps, you should be able to easily begin editing photos with Adobe Photoshop.
The Best Photo Editing Software for Professional Photographers
If you’re a professional photographer, you know that having the right photo editing software can make or break your work. With so many different programs available, it can be difficult to narrow down the best choice for your needs. To help you make the right decision, here is a list of the top photo editing software for professional photographers.
Adobe Photoshop: Adobe Photoshop is the industry leader in photo editing software. With its extensive selection of tools, filters and brushes, it is the perfect choice for any professional photographer. Adobe Lightroom: Adobe Lightroom is designed to help you manage, organize and edit your photos. It offers powerful tools to help you create stunning images and is ideal for post-processing and organizing large collections of photos. Capture One Pro: Capture One Pro is a powerful image editing tool from Phase One.
It offers advanced color correction, layer masking and RAW file support, making it a great choice for professionals who need to take their editing to the next level. ON1 Photo RAW: ON1 Photo RAW is a versatile and easy-to-use photo editing software. It features an intuitive user interface, non-destructive editing, and a large selection of filters, tools and effects. Skylum Luminar: Skylum Luminar is a powerful photo editing tool that simplifies the workflow for professional photographers. It offers a wide range of tools and effects to help you create beautiful photos.
No matter which program you choose, your images will benefit from the latest editing technology. With the right photo editing software, you can make your photos look stunning.